


Fraudulent transfers are major sources of revenue loss across the financial services sector. PwC's 2022 report estimates a staggering $42 billion lost to fraud. To combat fraud, payment processors must identify fraudulent transactions in real-time and take action immediately.
Superblocks enables developers to rapidly build applications for customer support teams to detect and take action on transactions in real time by integrating with streaming sources like Kafka. With its secure deployment model, secrets management, role-based access control, and audit logs, Superblocks provides the critical compliance foundation needed to build bespoke internal apps in financial services.
In this tutorial, you will learn how to build a real-time fraud detection application using Superblocks. The application will stream transactions in real time from the native Kafka integration to the UI, enabling customer support reps to review any suspicious transactions as they occur. It will also integrate a MongoDB database to store a full log of transactions, so that when customer support approves or rejects transactions in real-time, that information is saved to our database. We’ll build this entire app in Superblocks with no frontend or streaming expertise, while meeting the security standards required for sensitive environments like payment processing, out of the box.
Building a real-time dashboard based on Kafka events
Configuring the Kafka cluster
Integrating with Kafka is straightforward. For this example, first set up a Kafka cluster using Confluent Cloud with a fraud_detection_demo topic. This topic contains transactions with details like sender, receiver, amount, and risk level. In this example, we’re using Confluent Cloud as an example Kafka service, but any Kafka service will work. Here's a sample transaction:
In the Confluent Cloud Cluster Overview page, note the following information:
- The cluster Bootstrap server found under Cluster Settings → General tab → Endpoints section
- The cluster API key and secret found under API Keys
Creating the Kafka integration in Superblocks
In Superblocks, create a new Kafka integration. Use the API Key, secret, and bootstrap server URL values to configure the integration in Superblocks. Alternatively, utilize the native Confluent integration detailed in a previous tutorial.
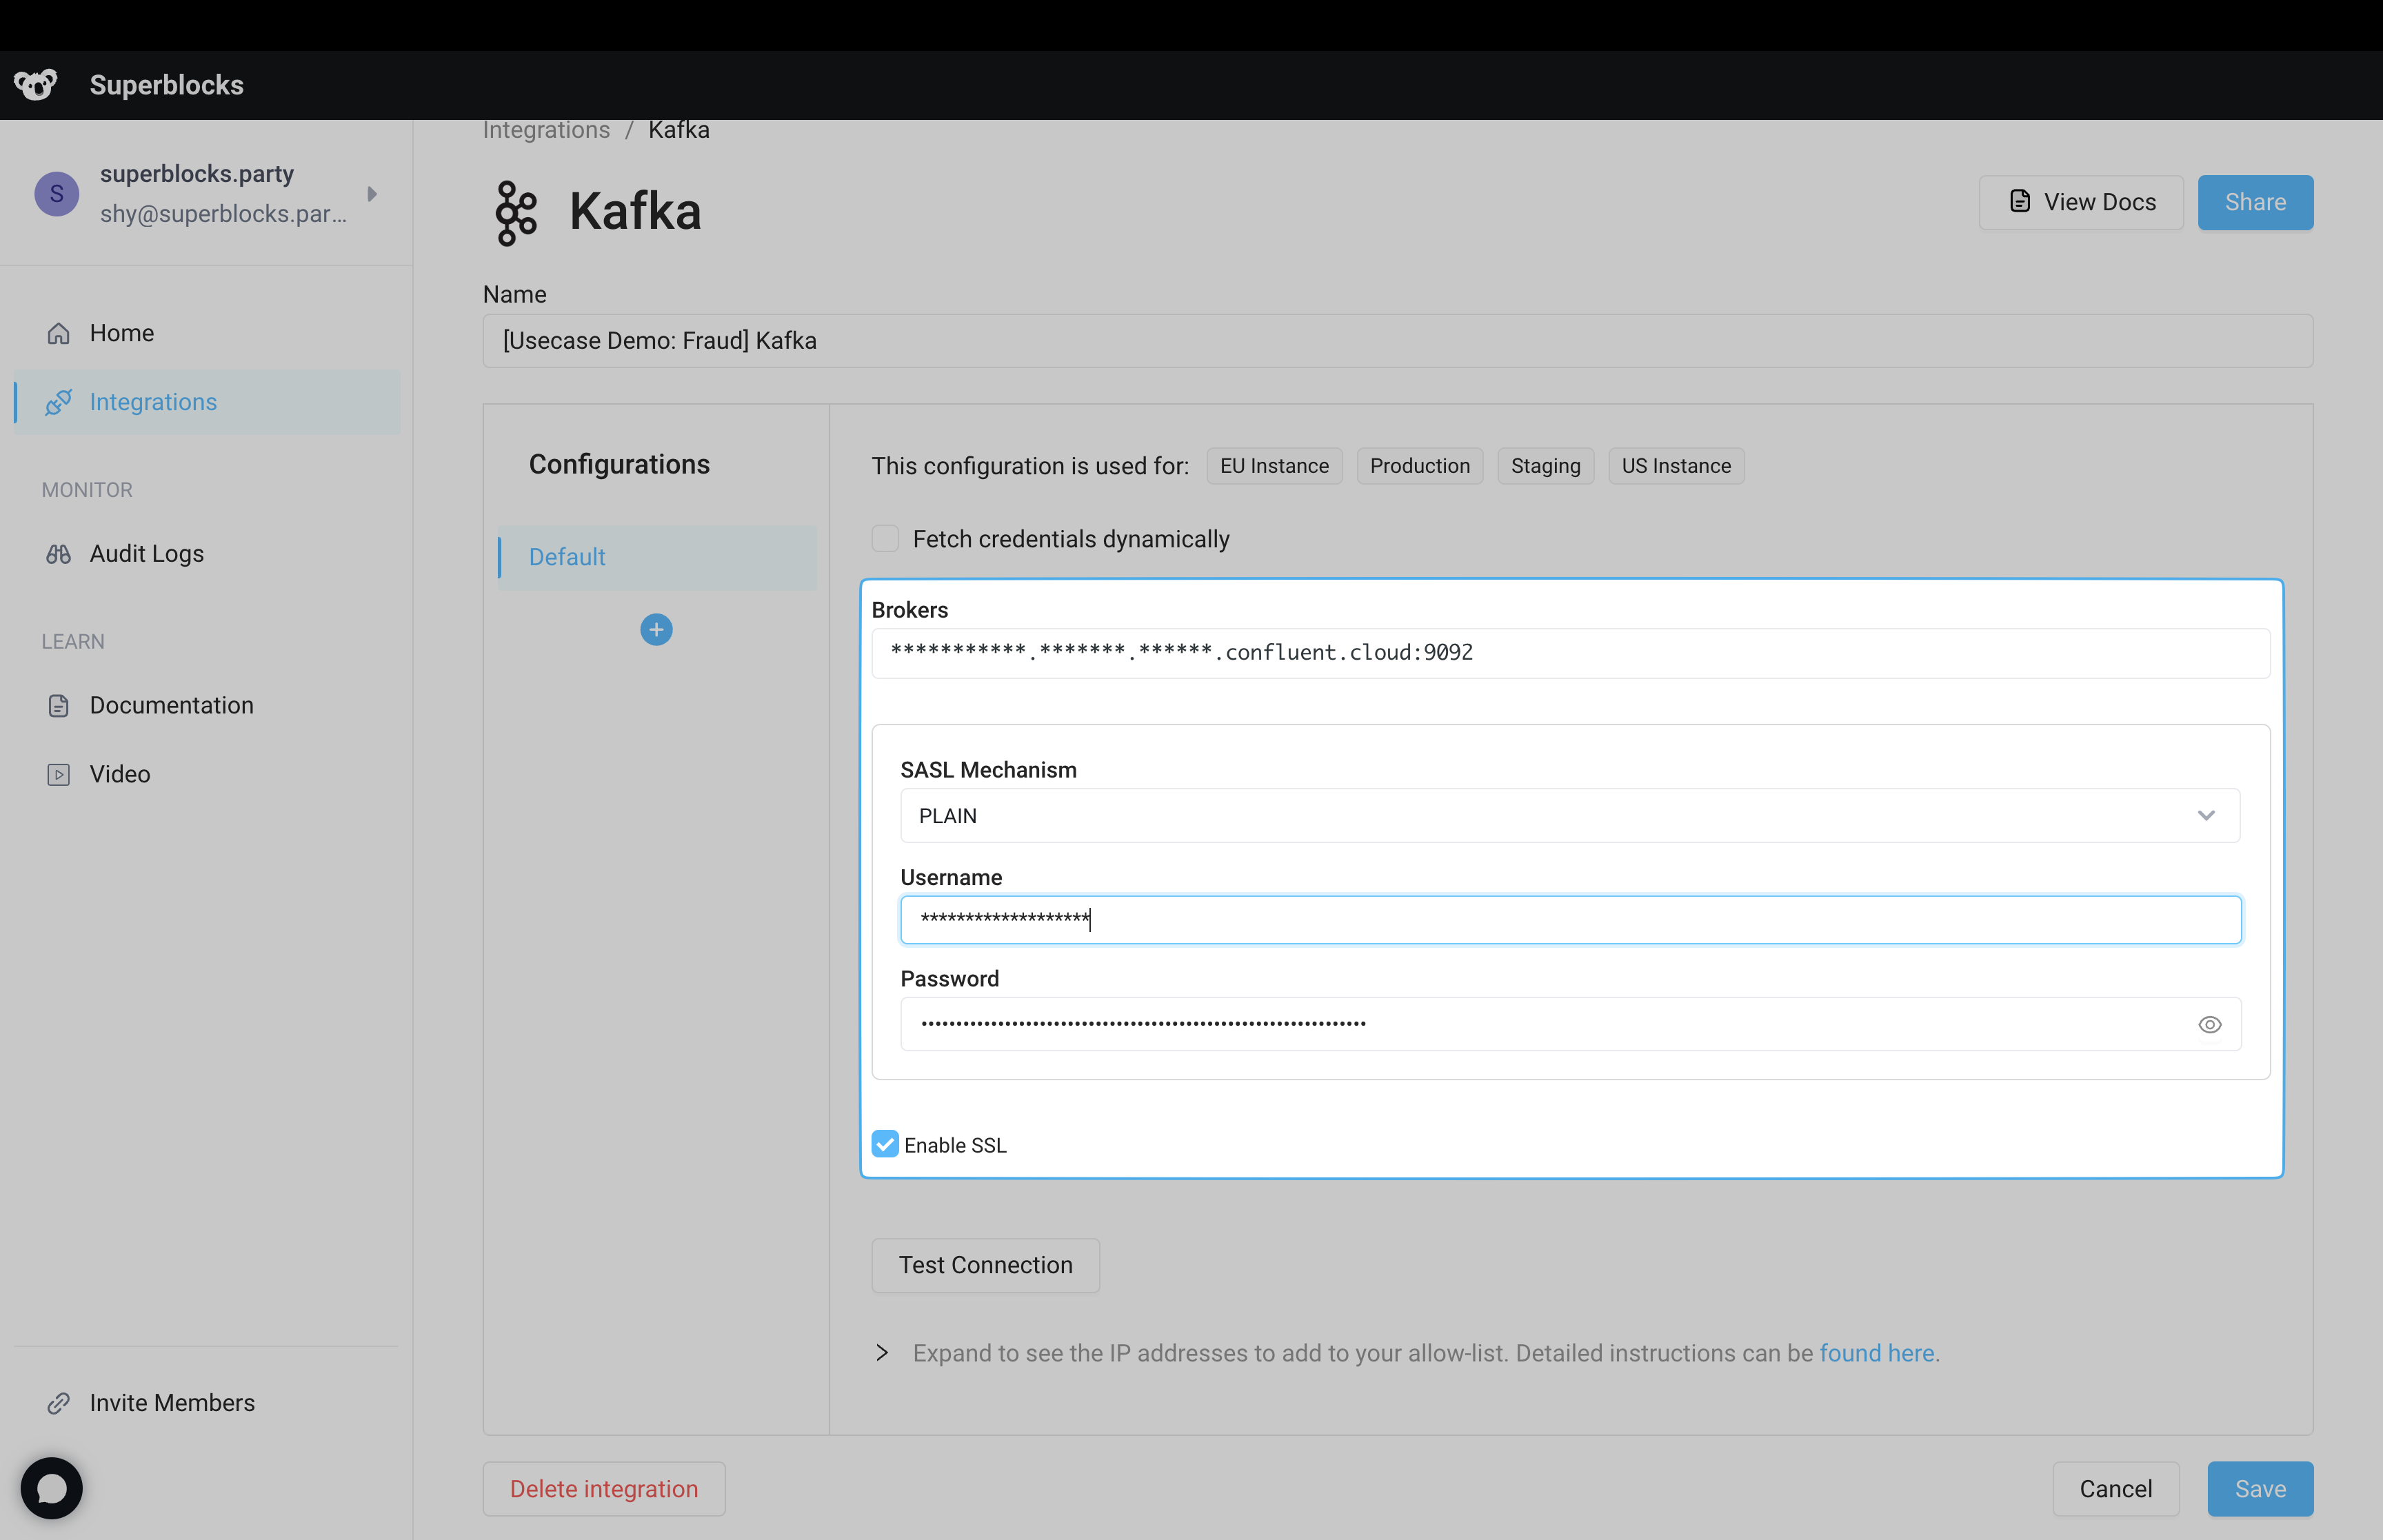
Click “Test Connection” to confirm that Superblocks can connect to the cluster, then save the integration.
Building the application
With the integration saved, create a new application from the Superblocks homepage.
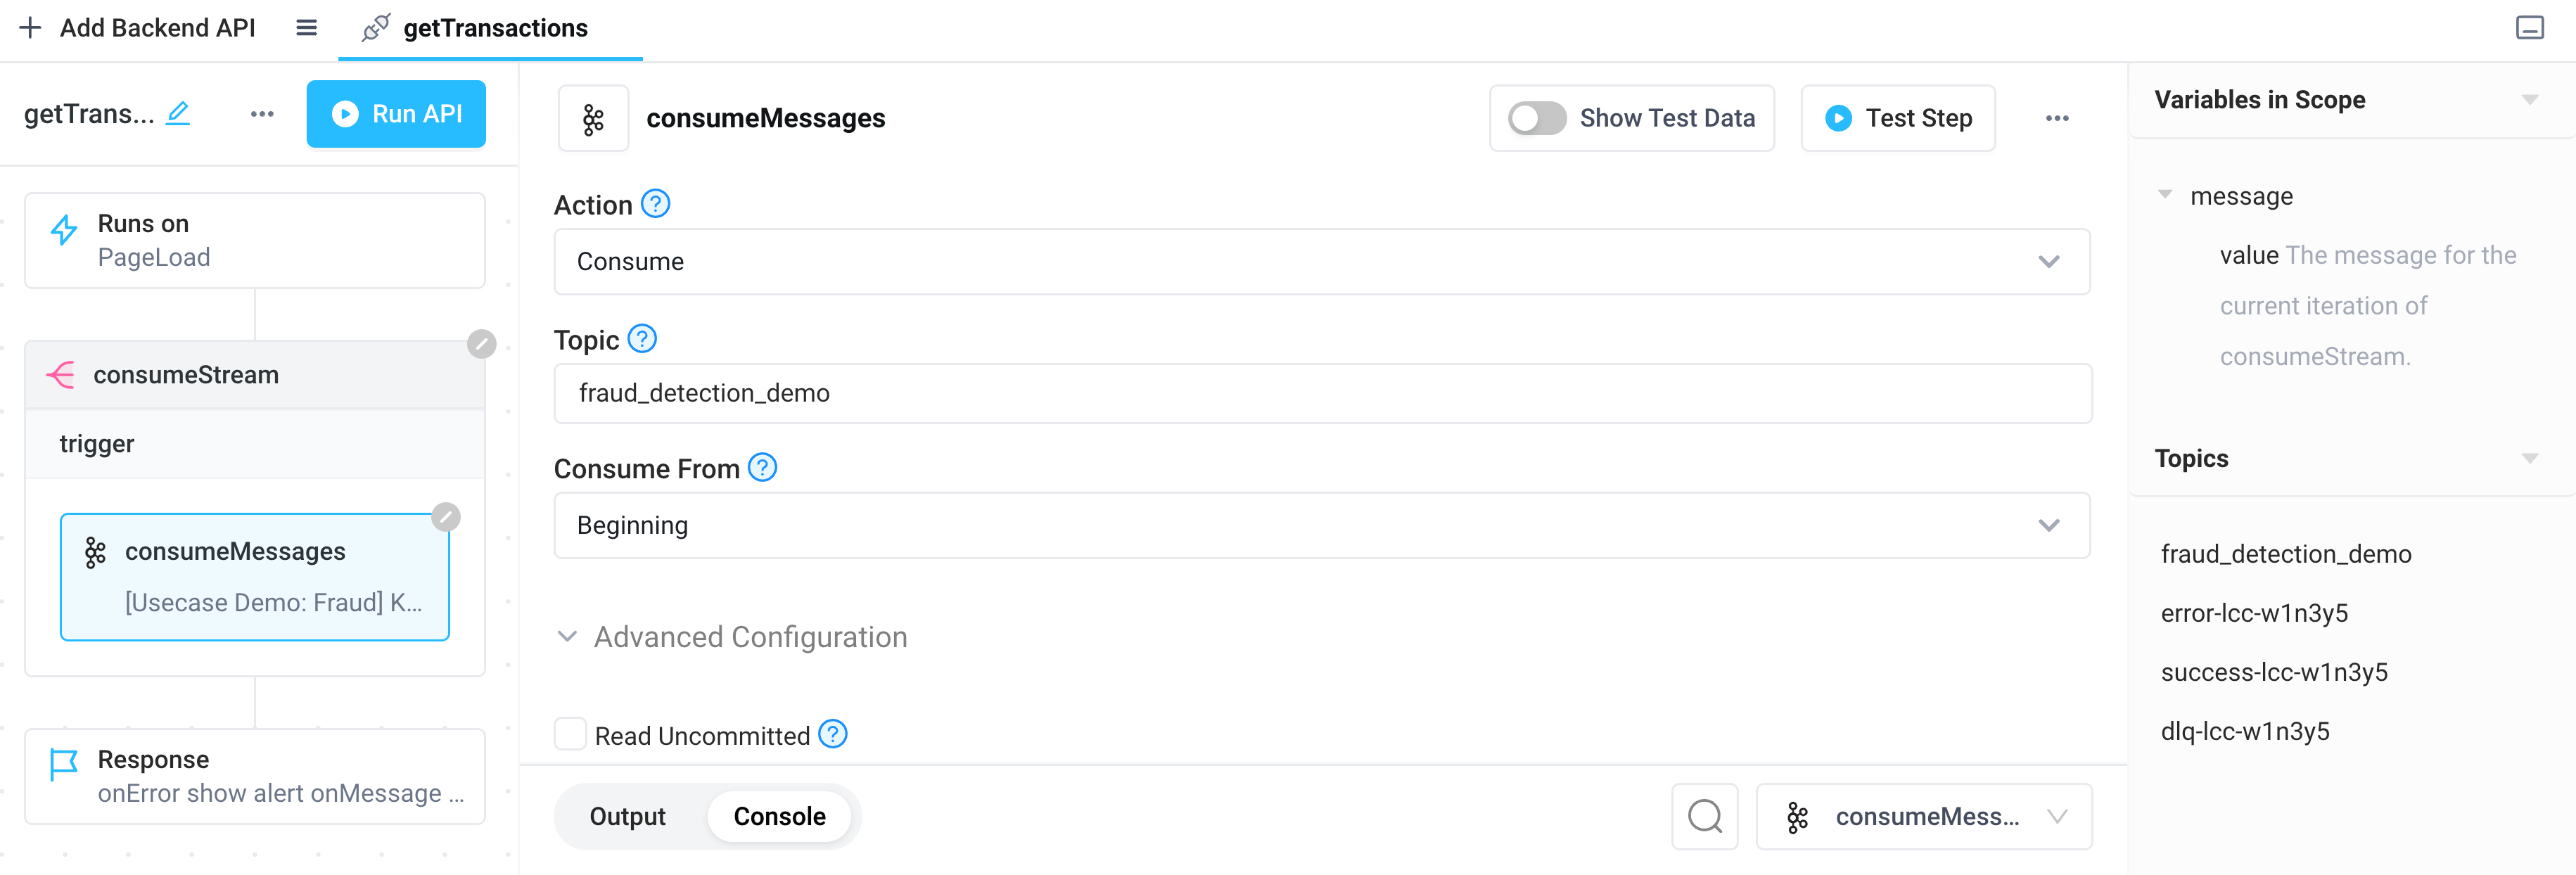
Start by building a new backend API for the application to receive data from the Kafka integration with a single Stream block. Name the API getTransactions and the stream step consumeStream. In the stream step, add the newly created Kafka integration, configure the action to consume data, and the topic as fraud_detection_demo. Set consume from to Beginning for this initial version of the application.
When this API runs, it will begin consuming messages from the start of your topic.
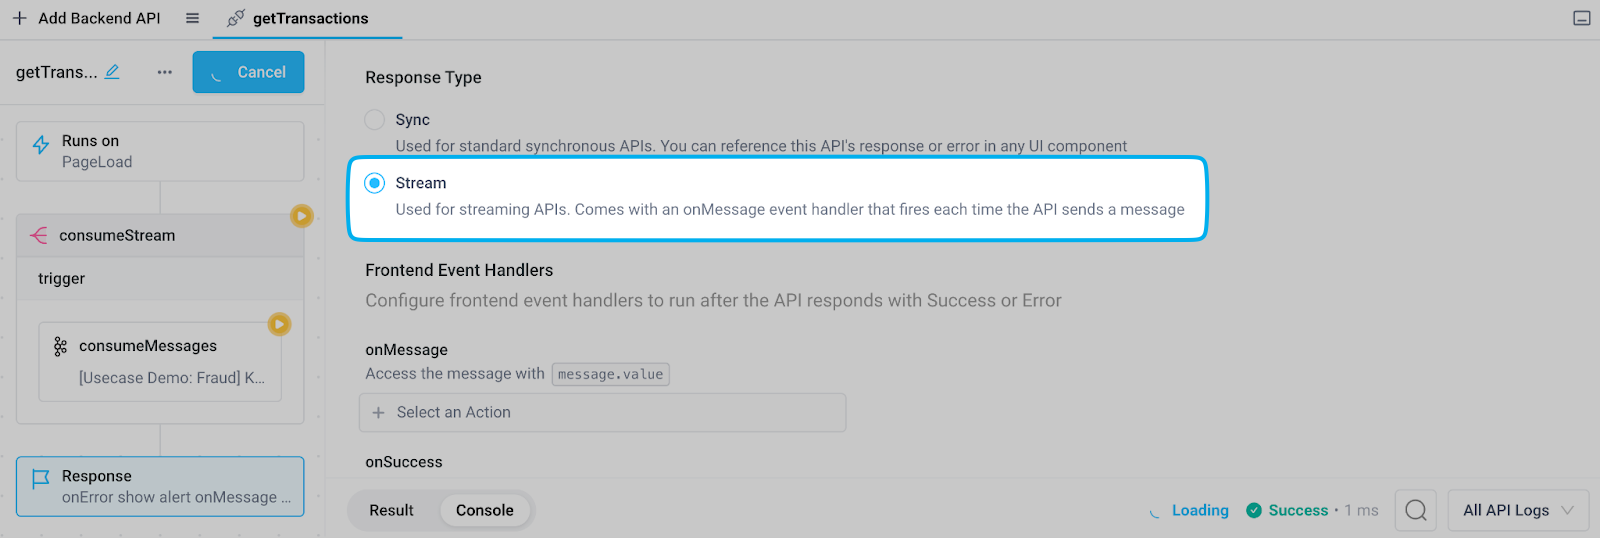
In the response section of the API, configure the response type to stream, then run the API. Data will begin streaming in from Kafka.
Streaming data to a frontend state variable
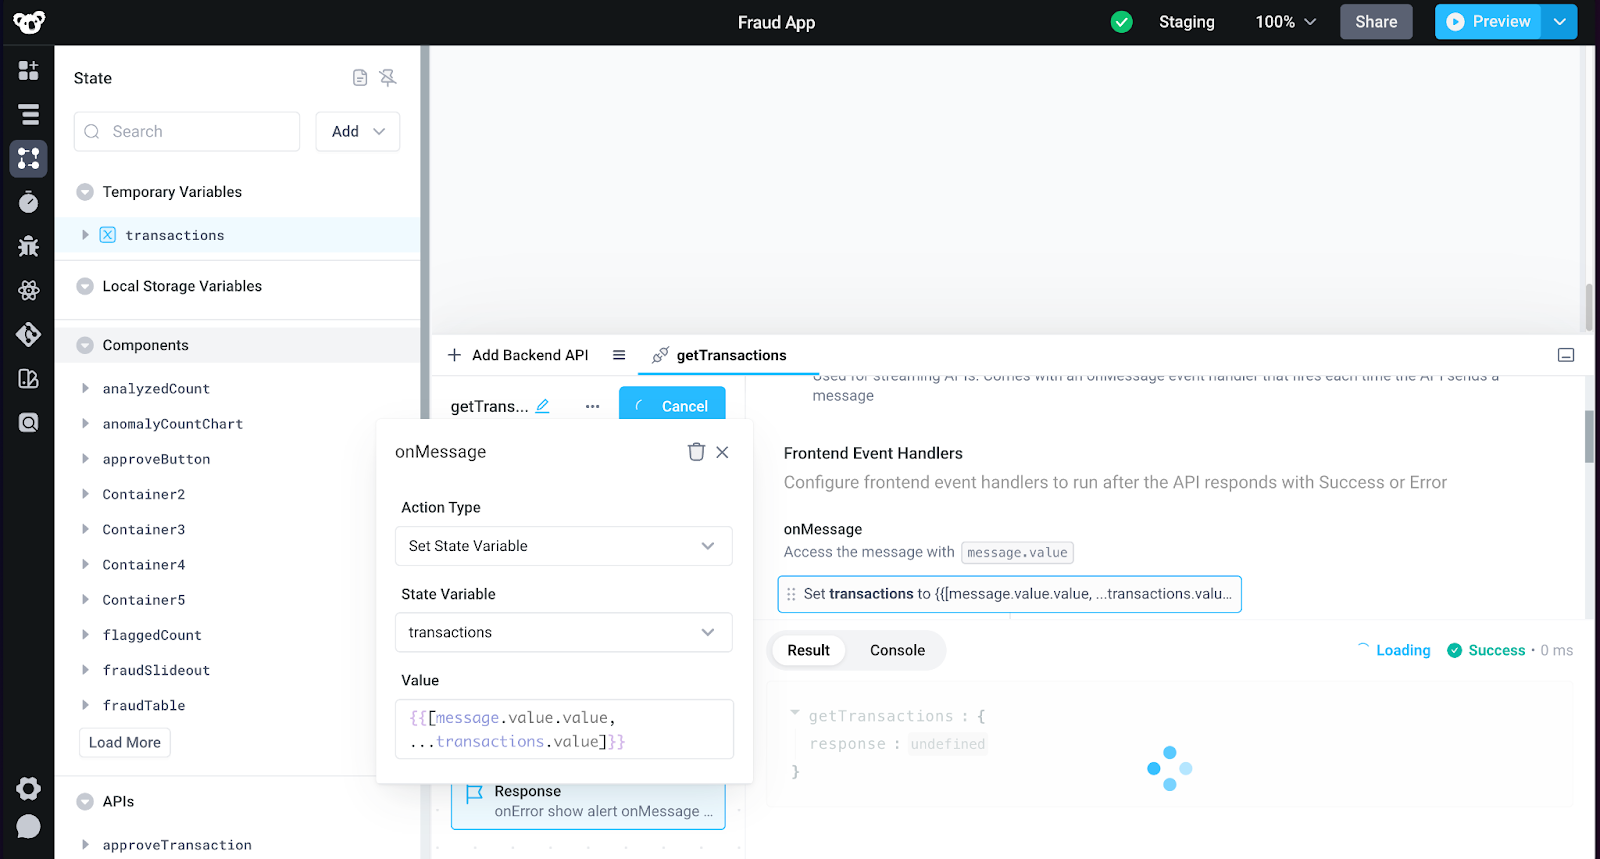
Next, we’ll need to make the data streaming into the backend API available to our frontend so we can display it in the UI To do so, we’ll use a State Variable along with the onMessage event handler provided by the stream response type.
First, create a temporary state variable with a default value of an empty array. Name the variable transactions.
Head back to the onMessage event handler in the getTransactions API to connect the backend data to the frontend state variable. Add an onMessage event handler that sets the transaction state variable with the Set State Variable action.
Set the state variable to an array of objects by prepending the transformed message returned from the stream block (accessible through message.value) to the latest value of the state variable using JavaScript spread syntax:
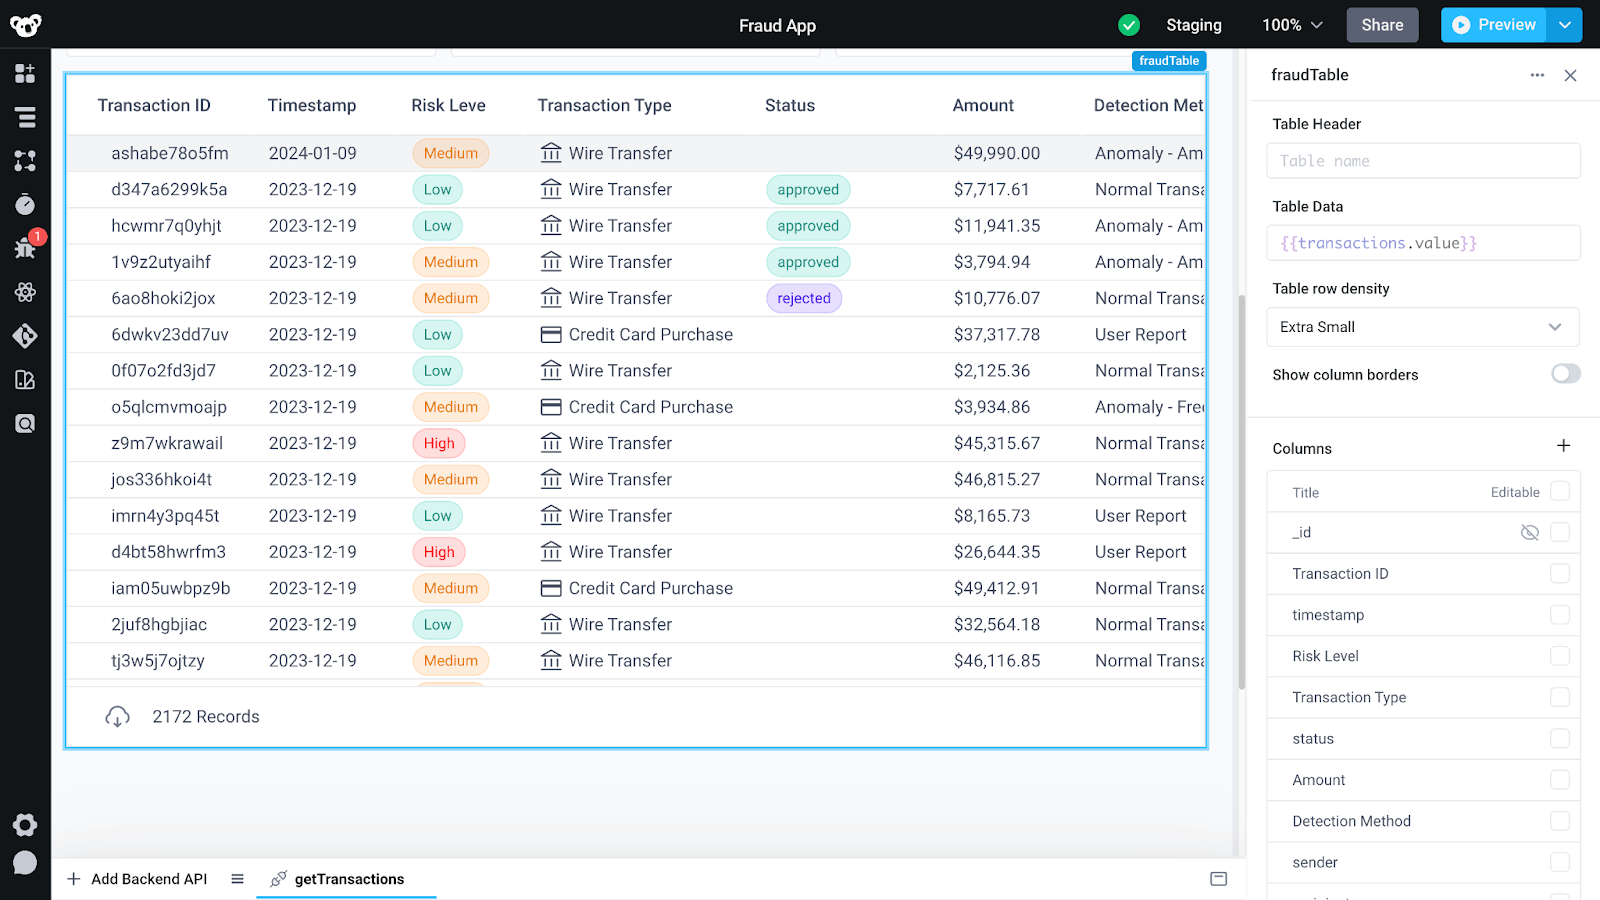
Displaying live transactions in a table
The next step is to create an intuitive interface for customer support teams. Using Superblocks' drag-and-drop functionality, add a table named fraudTable. Set the Table Data property to {{transactions.value}}, which is the state variable we just created to write transactions to from our streaming API. The table will now displaydisplay transaction data in real time, since it is displaying the value of that variable. This setup allows representatives to monitor and act upon suspicious transactions efficiently.
Displaying transaction insights as hero numbers
We also want our app to include informative charts and aggregate information about our transactions.
Superblocks supports writing code to conditionally format data and components displayed on the frontend using Javascript. Using double curly braces, which we call bindings, you’re able to write Javascript expressions enabling you to insert dynamic data and state anywhere in the application front-end. For instance, you can display a dynamic count of analyzed transactions using JavaScript by dragging on a text component and setting its value to
This component will also update in real-time as the table data it references is updating.
A more complex example to identify how many dollars are tied up in potential fraudulent transactions can be calculated in a different text component using Javascript:
Using charts for more detailed real-time visualizations
Adding charts is straightforward with Superblocks’ built-in UI components. Create an area chart by feeding in transaction data and configuring its appearance for easy interpretation.

Saving approval status in MongoDB
After establishing a system for streaming transaction data and developing a user-friendly interface for monitoring, the next critical step is empowering customer support representatives with the ability to take immediate action.
In this section we’ll connect Superblocks with MongoDB to enable each suspicious transaction to be reviewed for approval or rejection, save that decision in persistent storage, and alert other parts of the business to respond appropriately.
Configuring the MongoDB Integration
Set up a MongoDB collection, fraud_detection_demo to utilize for this tutorial.
From MongoDB, noted the following information:
- The Connection URI that MongoDB Cloud provides when clicking the Connect button.
Create a new native MongoDB integration in Superblocks. Use the Connection URI, and collection name to configure the integration.
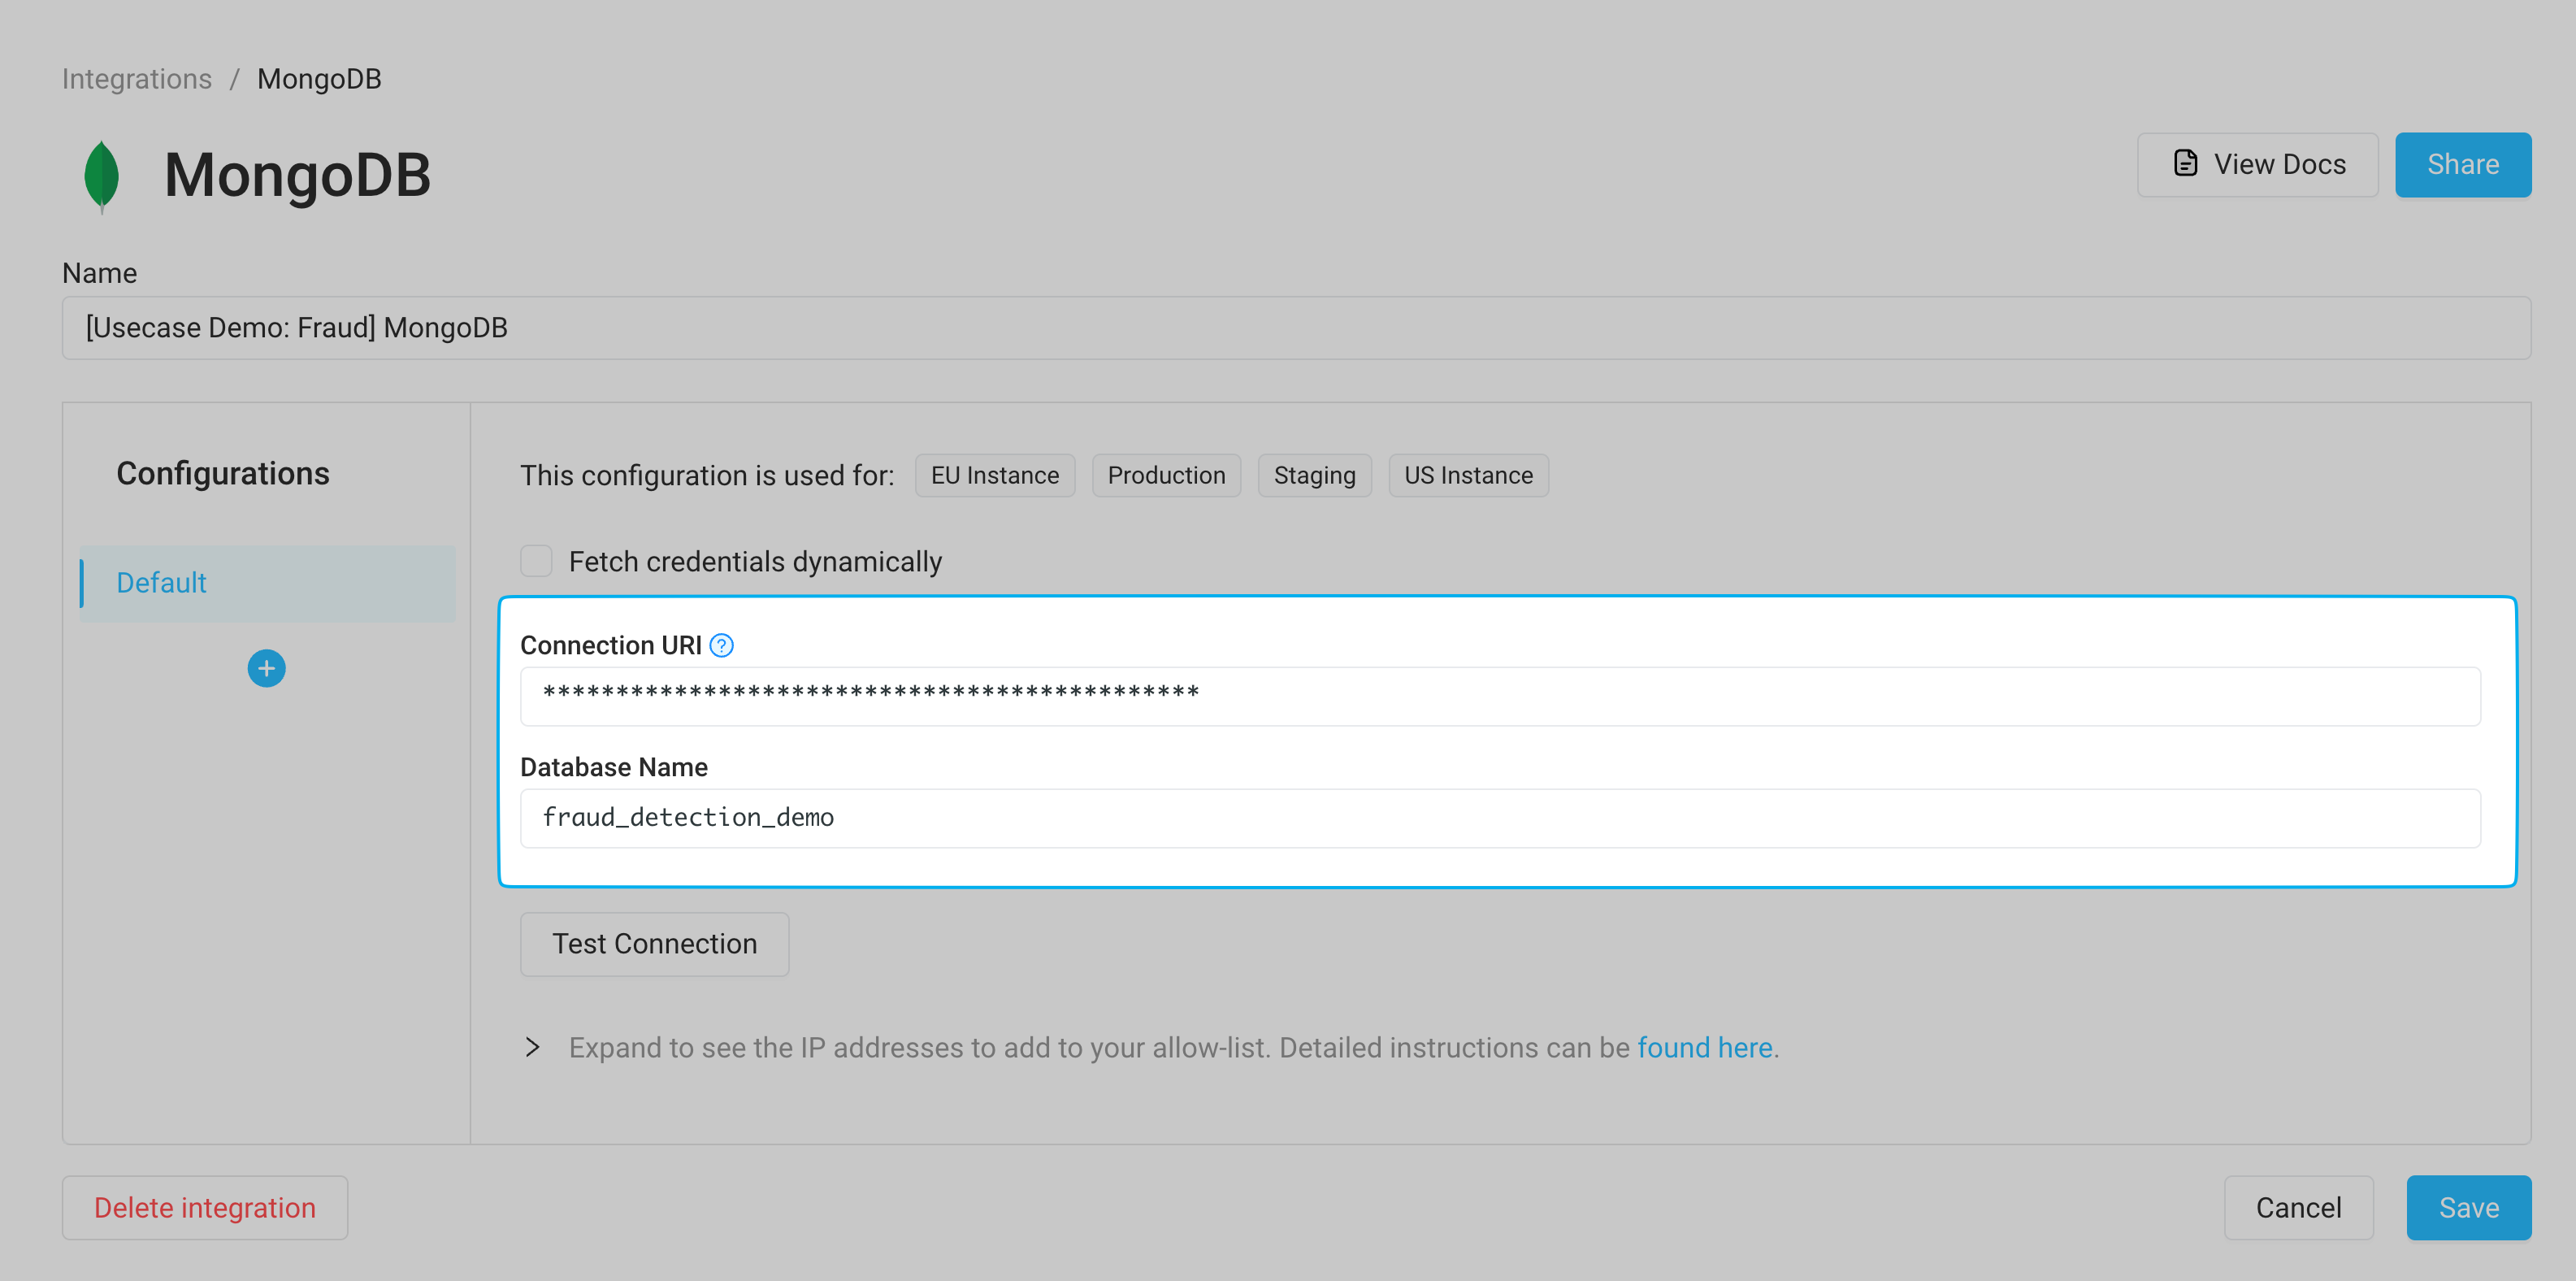
Click “Test Connection” to confirm that Superblocks can connect to the Database, then save the integration.
Saving transaction data to MongoDB with a Kafka Sink
Currently, the application streams in all our transactions from the beginning of the stream in Kafka. Doing so requires reading from the beginning of the topic, which takes time.
Rather than needing to wait for all transactions to stream in, we can use a Superblocks Workflow to save our transactions as they occur to a database.Then, we can query that database to backfill historical transactions into our app. Kafka supports connectors, services which read data from at least one topic in Apache Kafka and write to a target system, known as a sink.
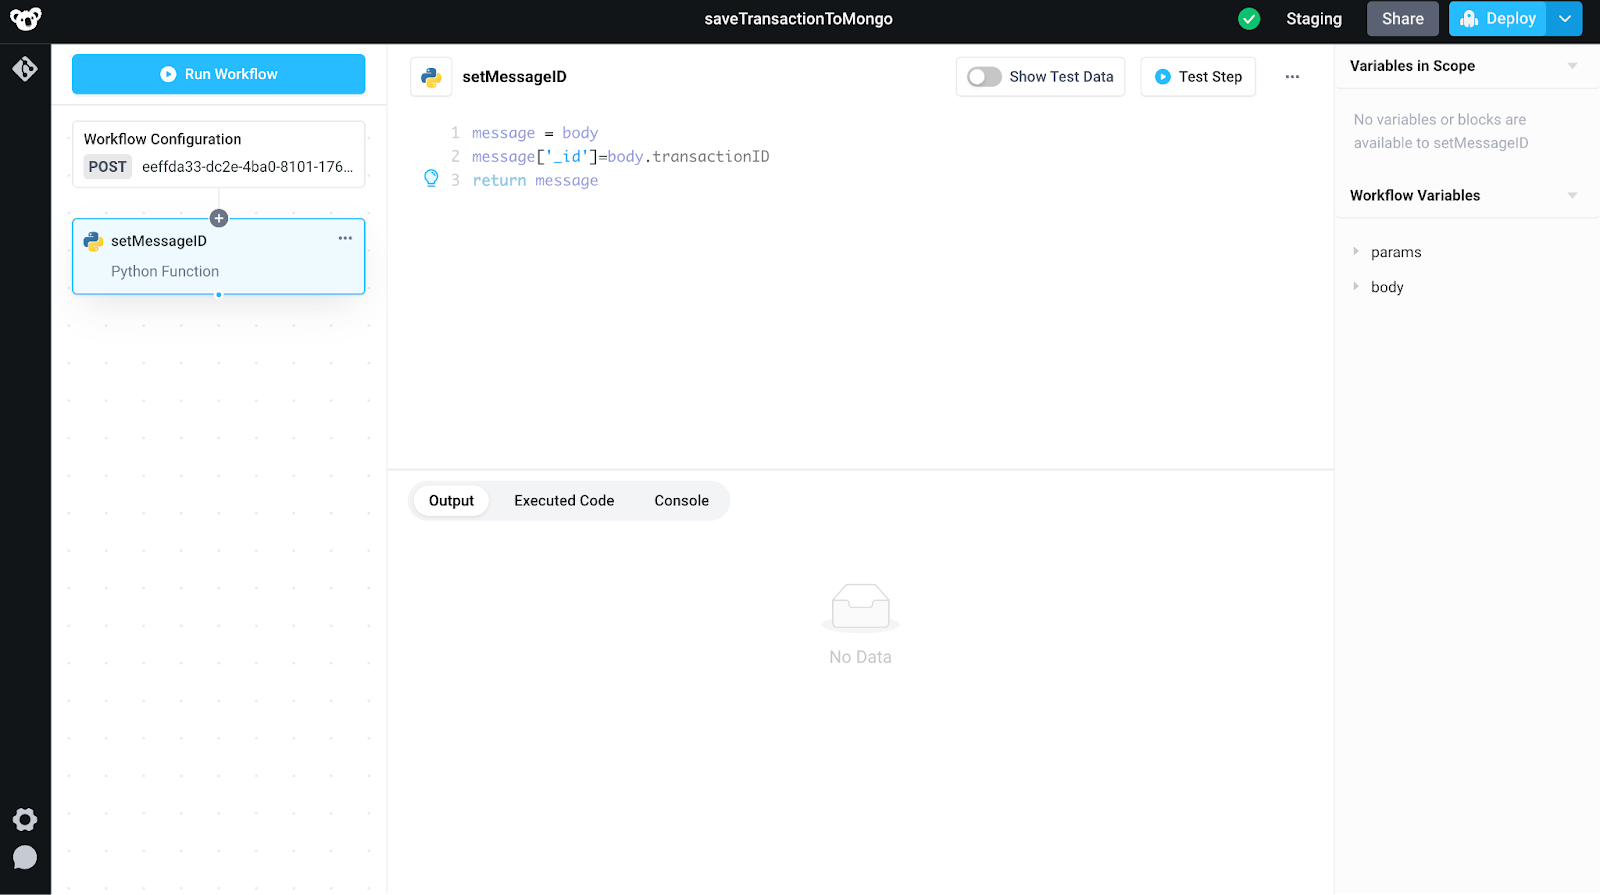
To set up this workflow to save transactions to a database, create a new Workflow from the Superblocks homepage. We’ll utilize this workflow as a Kafka Sink to store new transactions.
To start configuring the workflow by providing it with an example of the body it can expect utilizing the same sample transaction provided to Kafka.

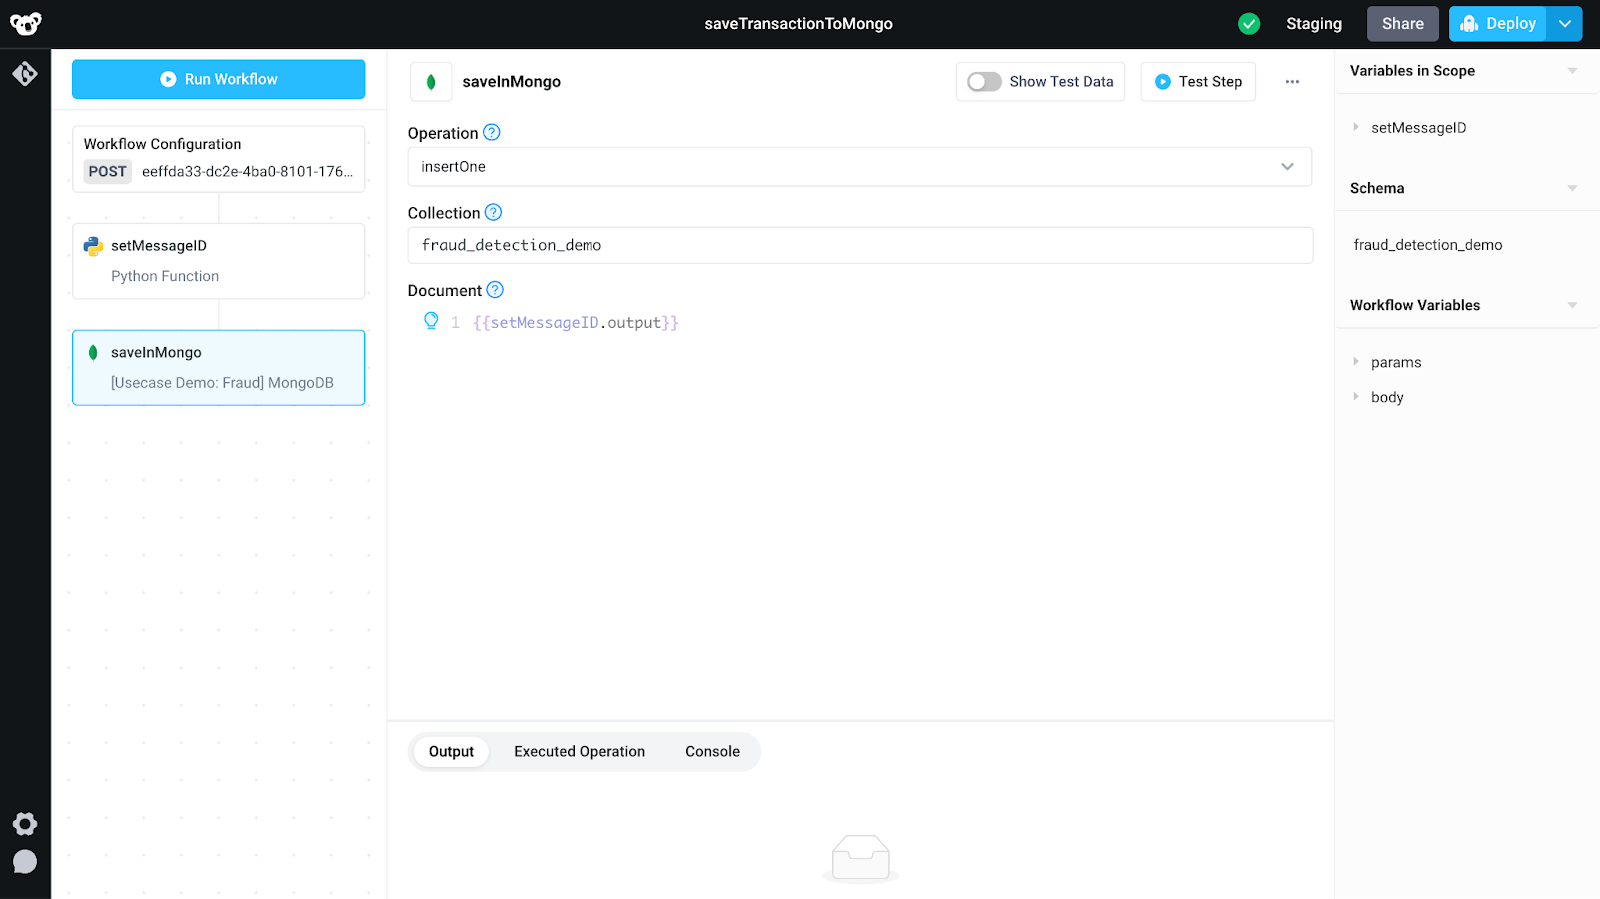
MongoDB will need an _id field provided with our data to save our transaction. Add a single python step named setMessageID to reuse the transactionID as _id.
Add a MongoDB step, with the new integration, utilizing the insertOne operation to insert a transaction into the database.
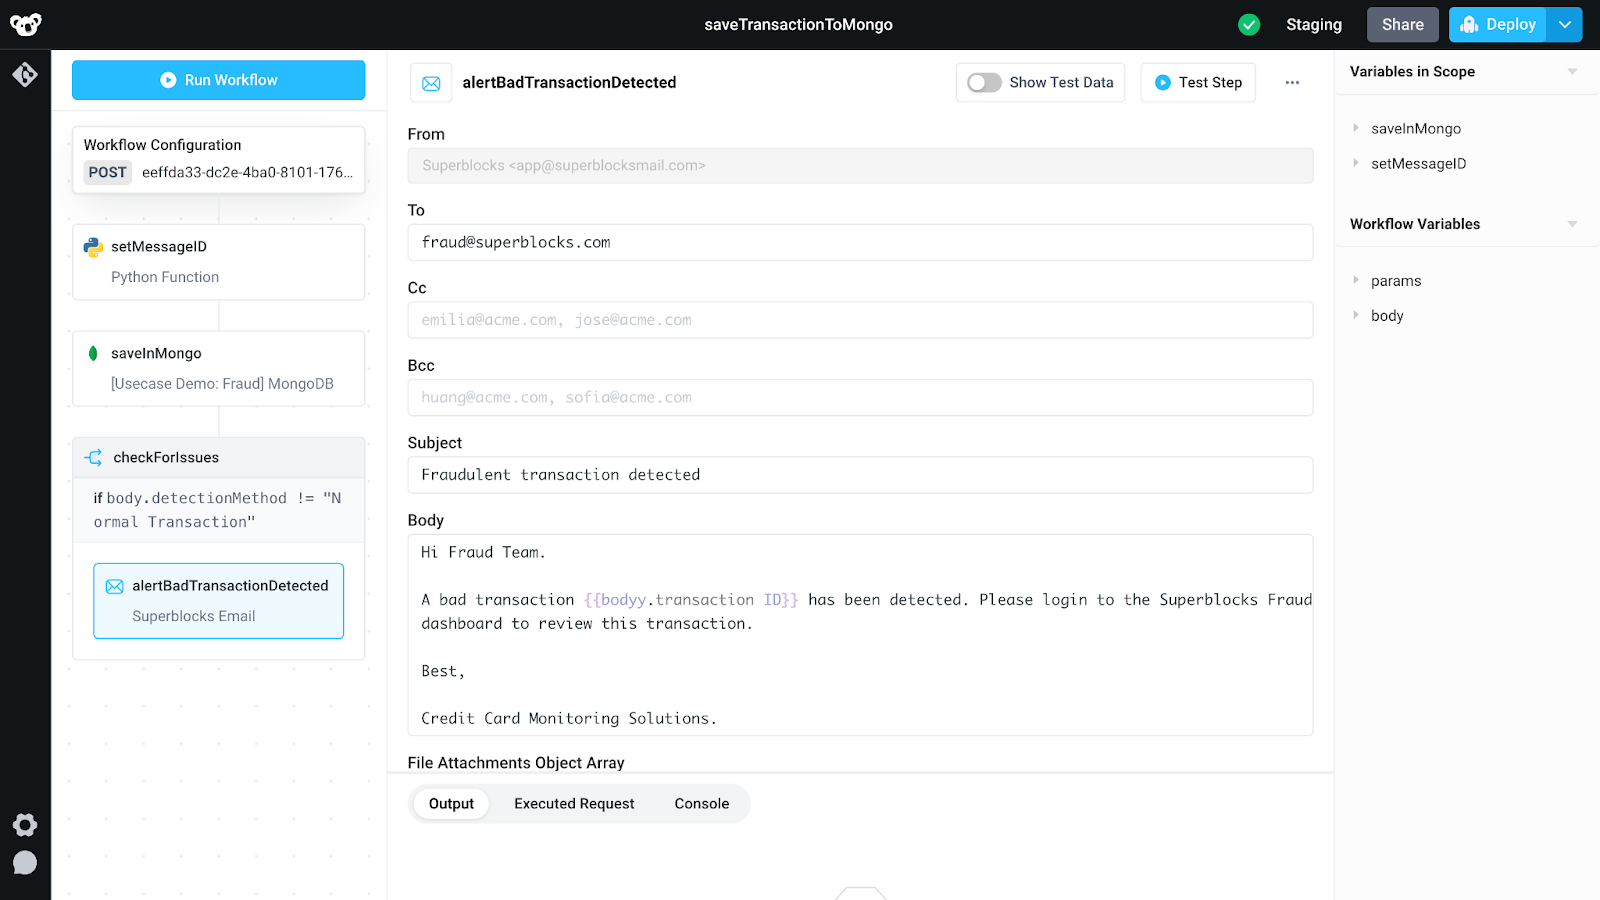
This is enough to save our transactional data into MongoDB. We can extend this workflow to additionally alert the team when a bad transaction is detected using a single extra condition block. In the condition block, create a check to see if a transaction is “Normal”. If it isn’t normal, send an email alerting our customer reps using the built-in Superblocks email integration.
Click deploy to receive the trigger instructions needed to utilize this workflow, specifically noting the request URL and Authorization Bearer token. With this information, head back to Confluent Cloud and create a new HTTP Sink Connector.
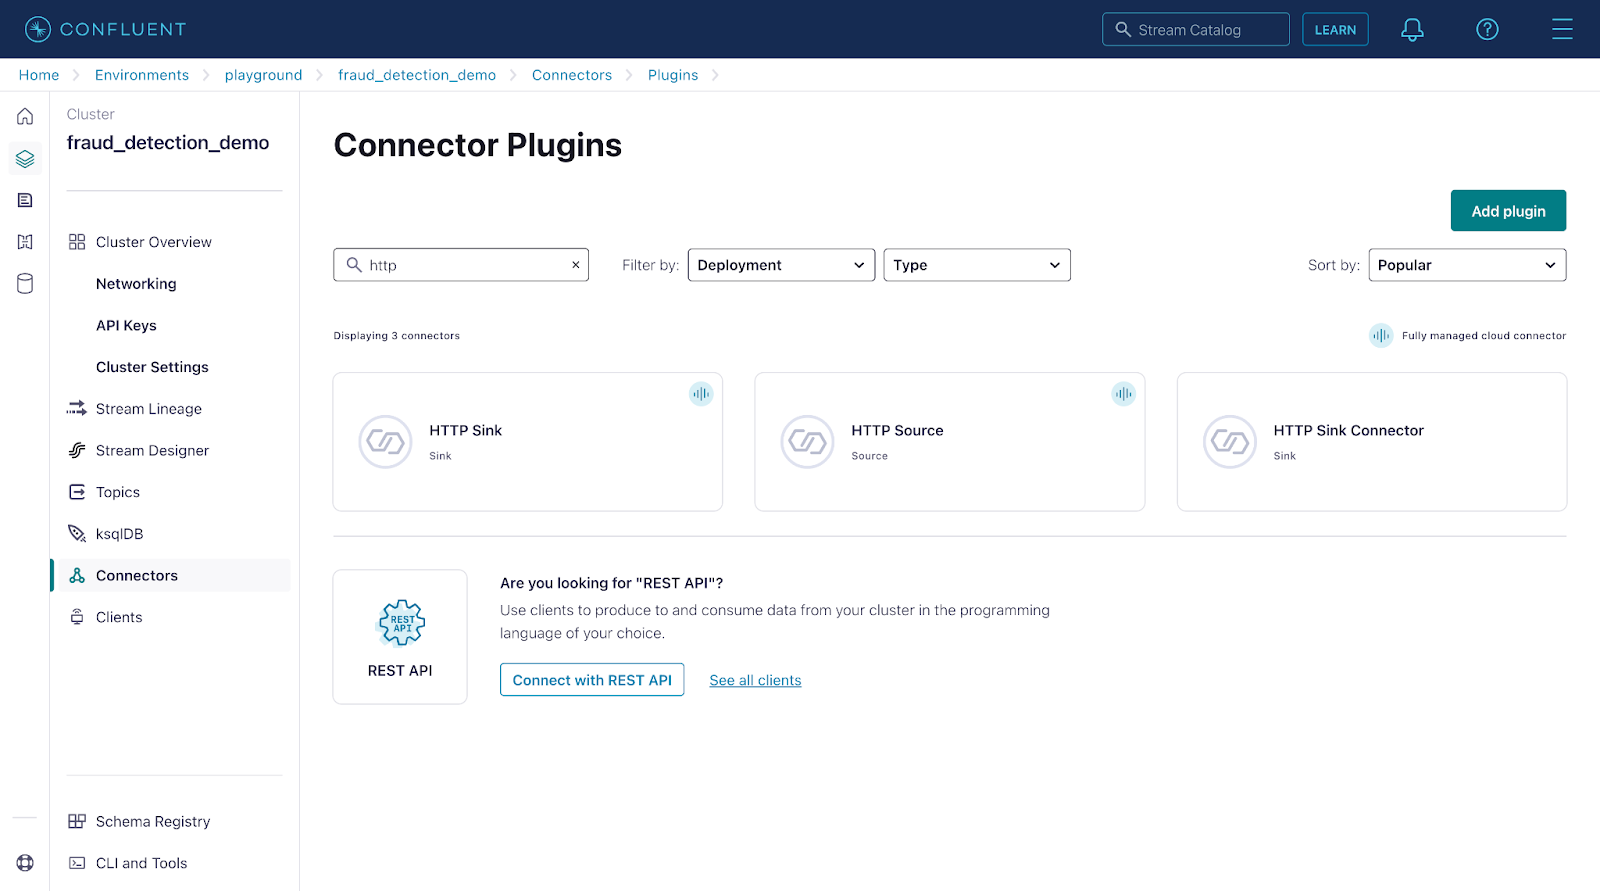
Provide the URL and Bearer Token from the newly created workflow to the HTTP Sink and hit save.

Now when a transaction is streamed to Kafka, it will be sent to the Superblocks Workflow and then saved in a secure MongoDB database.
Loading historical data
Heading back to the fraud dashboard, add a new backend API named intialLoad. Add a single MongoDB Step and use the find operation to query the fraud_dection_demo collection to load in all transactions.

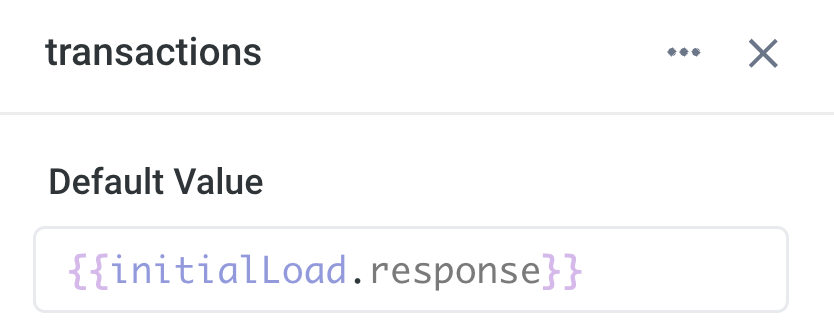
With data now loaded in, update the transaction state variable's default value to be the intialLoad API's response. Now this state variable include historical transactions by default, so these transactions are displayed in our table and other UI elements
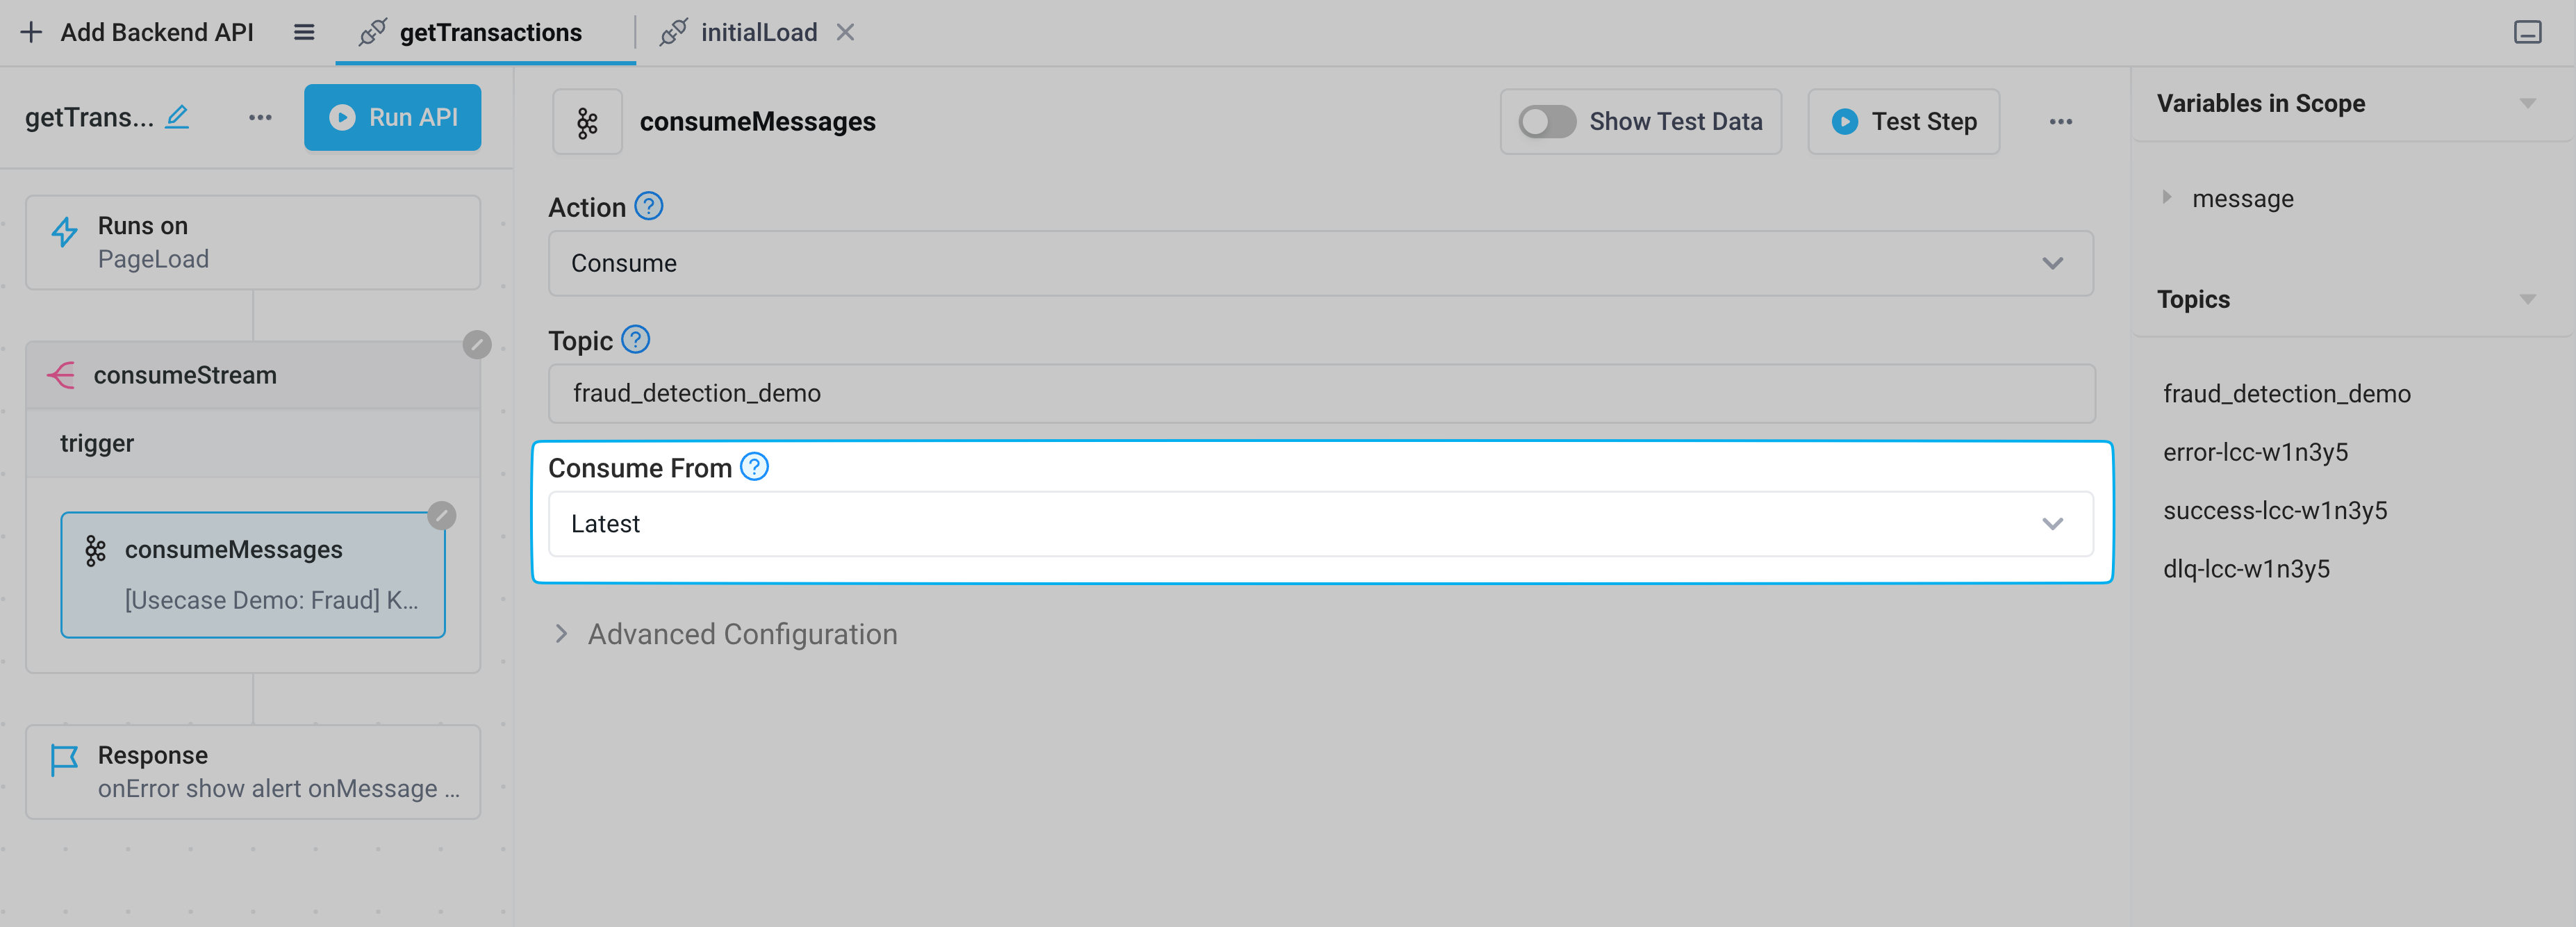
Finally, update the consume from configuration in getTransactions from beginning to latest. Now, rather than needing to wait for all transactions to stream in, this ensures the table is seeded with historical transactions. When a customer support representative opens the application historical transactions will appear instantly, and new transactions will be streamed in in real time.
Approving or rejecting transactions
With the application connected to MongoDB, we can now enable our Customer Support representatives to approve or reject suspicious transactions.
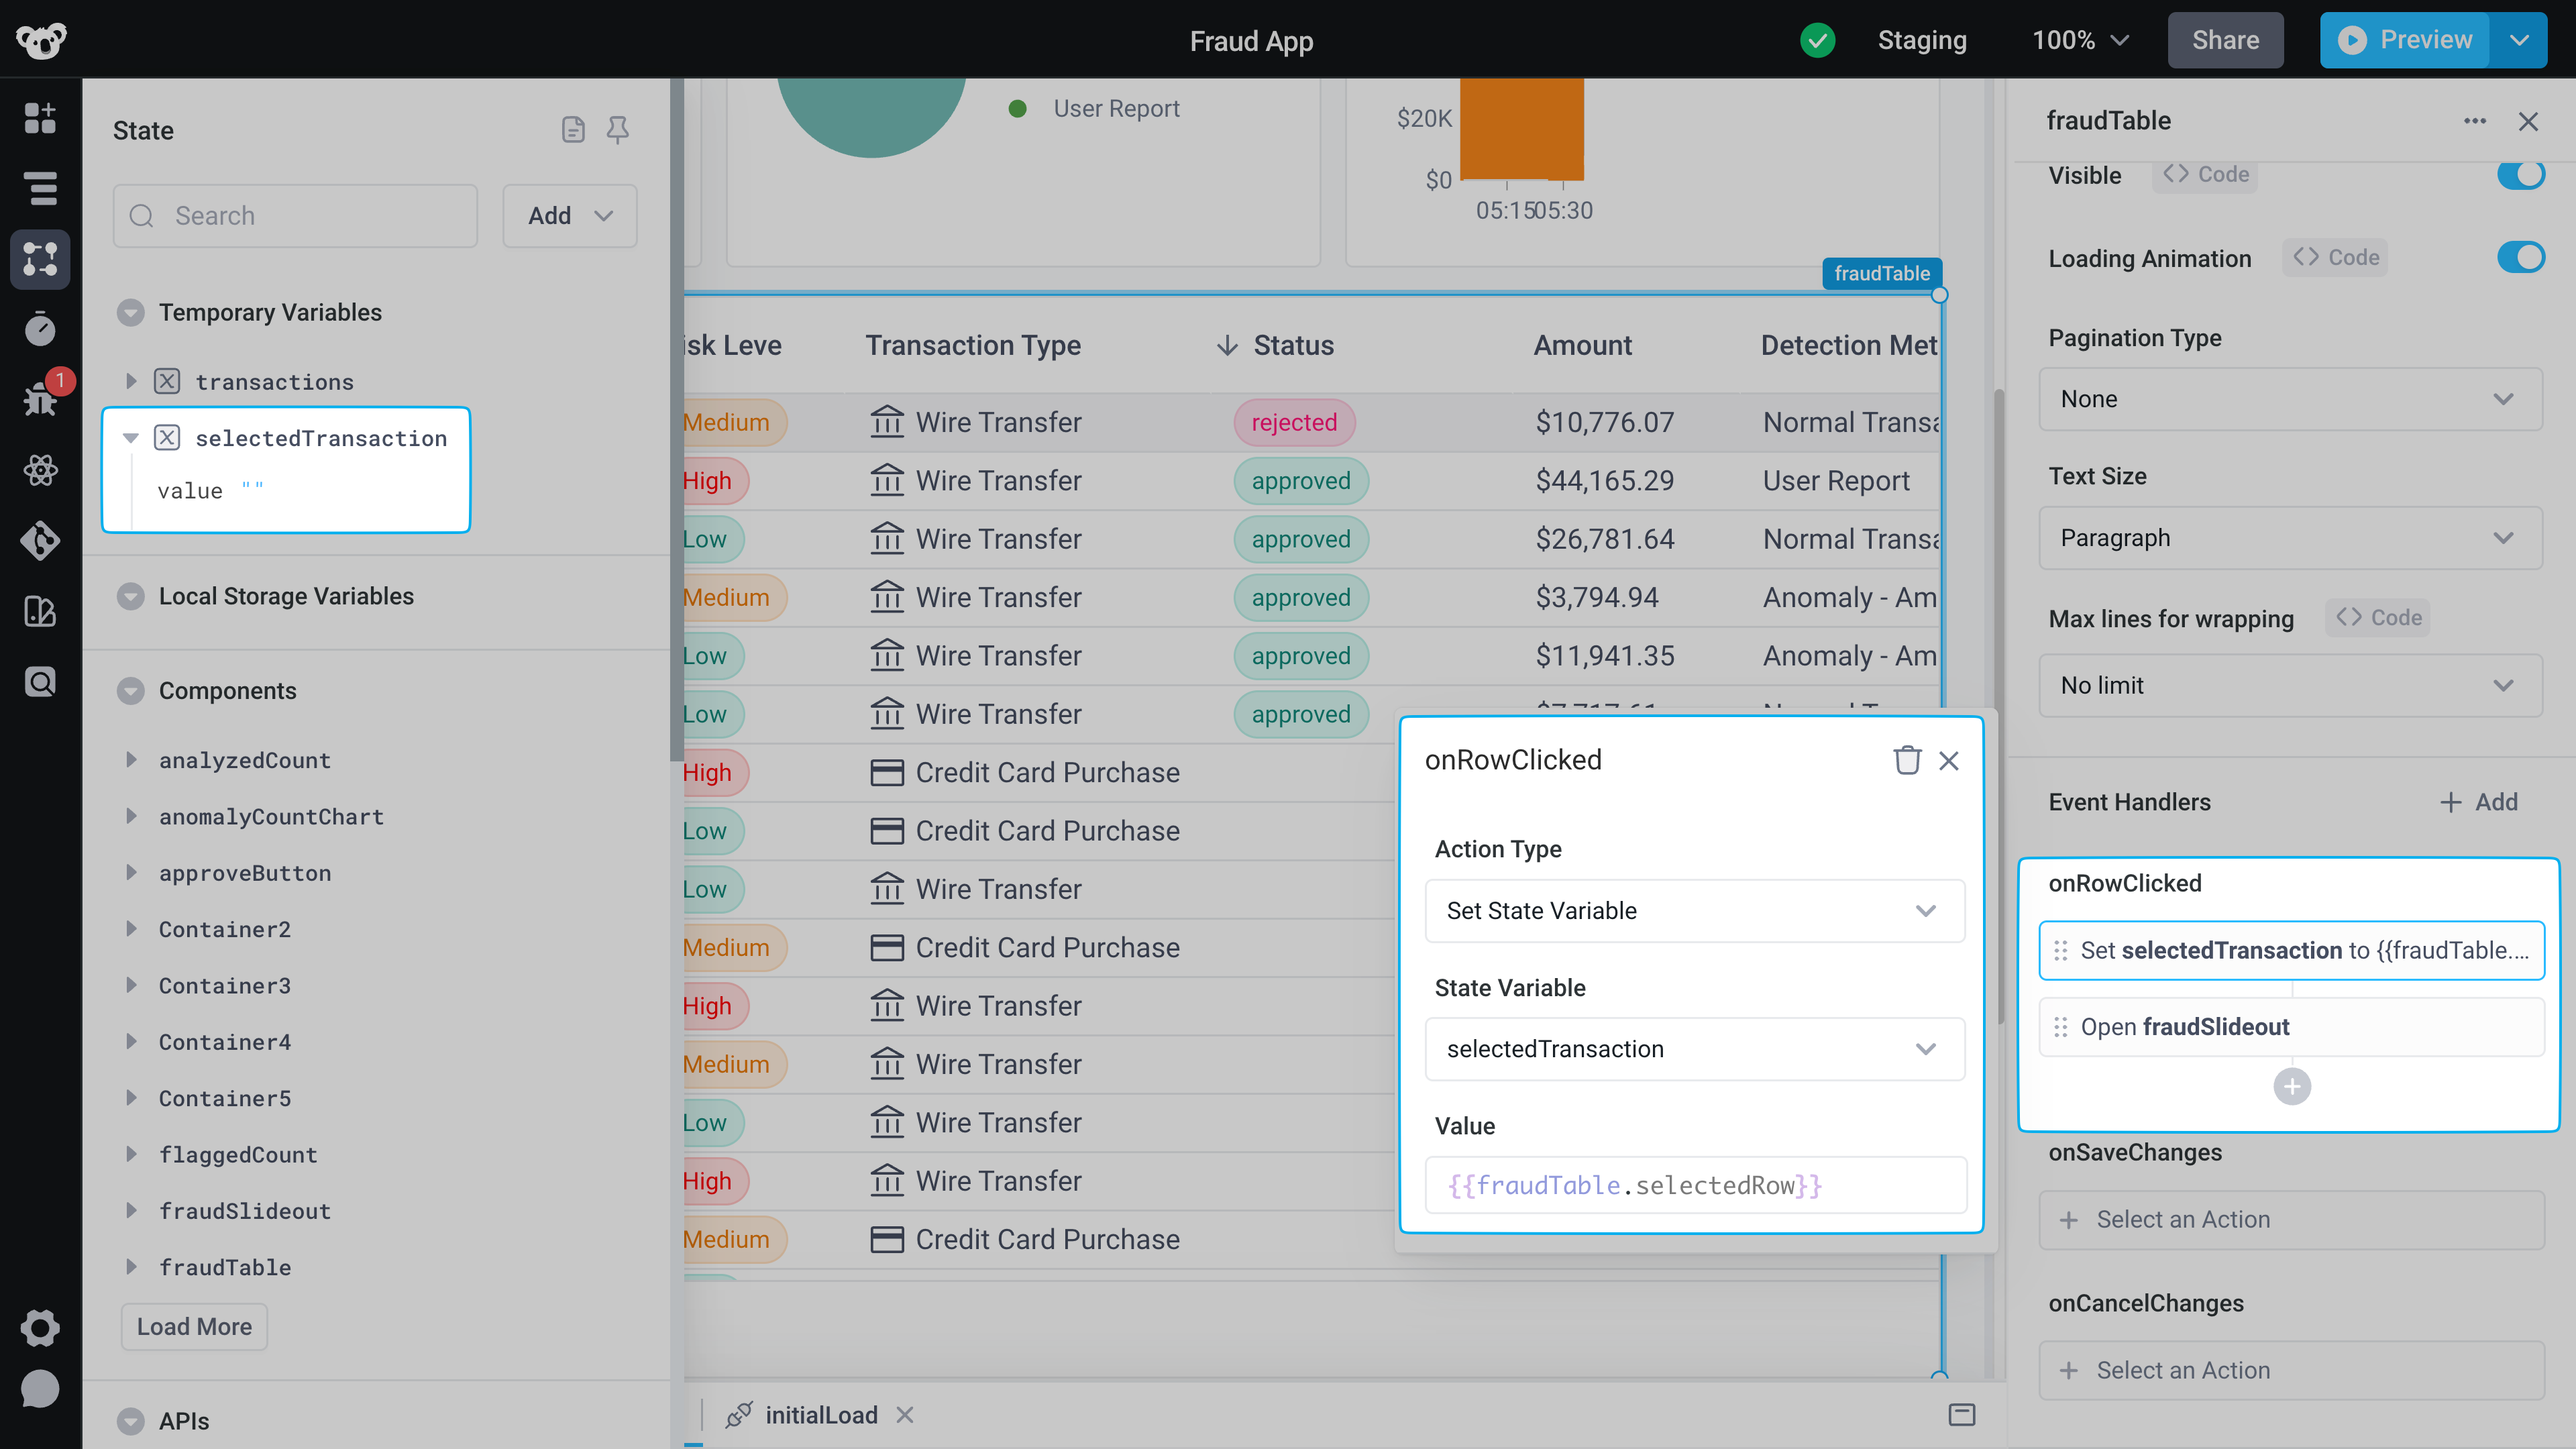
Create a new temporary state variable called selectedTransaction. Within the onRowClicked event handler on the fraudTable, add a step to set selectedTransaction to the currently selected row, and open up a slideout.
In the slideout, add a table, and two buttons, for approval and rejection.
In this table, we want to show related transactions - specifically those that the sender or recipient is involved in - so our customer service rep has the right context to approve or reject the transaction. We’ll use frontend JavaScript to filter our transactions accordingly.
On the onClickEvent handler for the approve button, create a new API called approveTransaction that uses the MongoDB integration, with the updateOne operation. Set the filter to be for our selected transaction ID and the update value to be approved.
Update the response of the onSuccess event handler to reload our data, by running the initialLoad API, and have it close our slideout.

Duplicate this API, rename it rejectTransaction, and attach it to the reject button onClick event handler. In the update step, rather than approve, set it to reject. Add a slack integration, selecting the Send a message to channel action, alerting the team when a transaction has been rejected, enabling them to have insight into the transaction pipeline and let them start the process of reversing fraudulent transactions as soon as a transaction is detected.
Conclusion
In this tutorial, we’ve created real-time fraud detection tools for a payment processor. Our application enables customer support to view live transactions streaming in from Kafka, approve or decline those transactions, and save those reviews in MongoDB. Superblocks’ extremely simple visual builder enabled us to build this application faster than developing it from scratch, with no frontend or streaming expertise.
With Superblocks, we can iterate on this apprapidly, enabling the support team to process high volumes of transactions to mitigate fraud as our business scales. Because Superblocks is infinitely extensible with code, we can build complex backend APIs with NodeJS, Kafka & MongoDB, and leverage Javascript on the front end, ensuring we can build any functionality without limits to best serve our internal teams.
To learn more about getting started with Superblocks take a look at our documentation for tutorials, best practices, and more.


Stay tuned for updates
Get the latest Superblocks news and internal tooling market insights.
Request early access
Step 1 of 2
Request early access
Step 2 of 2
You’ve been added to the waitlist!
Book a demo to skip the waitlist
Thank you for your interest!
A member of our team will be in touch soon to schedule a demo.
Table of Contents
.png)
Multiple authors
Building AI Governance: 5 Principles & Frameworks
Ungoverned AI can expose your org to fines and public backlash. I analyzed the top responsible AI governance frameworks to share how to build trustworthy AI.
.png)
%20(1).png)